Nellie"s Needles

Tuesday, April 28, 2009

Collage Mania 2009

There are 39 pages of wonderful small art pieces that opened for viewing today. Go here for a visual feast. My contribution is a small version of the Smoky Mountain series and can be found on page 2. It was created with the same "ortwork" collage process described in my previous post.

You have the opportunity to own one of those 384 original art pieces by bidding at the online auction that begins May 5th. All proceeds from sales go to the American Cancer Society.

Saturday, April 25, 2009

Mountain Quilt Finished

I thought you may like to see the stages to complete this "ortwork" collage piece that features the Smoky Mountains. The background pieces from my scrap bag were laid out to establish the basic placement of the mountains, groves of trees, and sky during the Friday afternoon demonstration at the gallery in Gatlinburg. I had in mind to portray the new growth that I had observed on the drive to the mountains. This step is akin to doing an "under painting".
Friday evening at home I added details with more bits of fabric scraps. There was a lot of cutting with scissors and the rotary blade. Angora yarn and wool roving was used to soften and blend areas.
A pale, muted red-violet tulle was laid over the surface to trap all those bits and pieces in place. Lots of pins held this sandwich of backing, batting, scraps, wool, and tulle together. I used a variety of threads, many of them variegated, to quilt patterns that suited each area of the scene. I like to use the zig-zag stitch setting for free-motion quilting of the trees.
It was then pinned to the design wall. Oil stick pastels were used to highlight and define shapes and edges. This is a slow process. After adding a touch of color or shading I need to leave the room or do something else before I can assess it with a "fresh eye" to see if the addition is convincing. A black permanent ink brush tipped marker was used to add more tree trunks and branches to the grove of trees in the foreground. To set the pastels the piece was sprayed with Krylon's clear acrylic. I use the one that has a UV ray protection to help guard against fading over time.
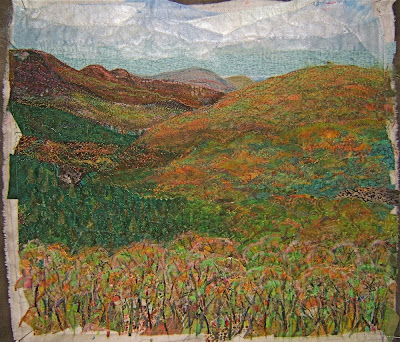
I squared it up trimming away the unfinished edges. You may recognize the fabric frame from the large mountain piece recently completed. I had intentionally made more than was needed for that piece, just in case I goofed cutting a mitered corner. Sure enough, I did ... and still had enough leftover to frame this one.

"Spring from Morton's Overlook" (2009)
20"x 18"
To see the other four "ortwork" collage pieces featuring this same view click on the Smoky Mountain Quilts lable.

Friday, April 24, 2009

Spring Gallery Gathering in Gatlinburg

Yesterday afternoon at Gatlinburg's "Spring Gallery Gathering" in the Cliff Dweller's Gallery I was one of seven artists demonstrating art. There was weaving, basket making, dulcimer making, pot throwing, marbleizing paper, and mixed media collage going on in the upstairs studios and on the front porch. I was set up in the gallery. My project was creating the base layer for my fifth mountain piece of the same view of the Smoky Mountains from Morton's Overlook.
Visitors were amazed that the one hanging on the wall for the afternoon began this way.
I got to the point of adding the finer details at the end of four hours.
"Silk Roses" along with several of my other quilts are among lots of art hanging on the walls. There are also four birds among the baskets and pottery on the shelves.

Wednesday, April 22, 2009

Smoky Mountain Quilts

This small quilt of the Smoky Mountains is my contribution to Collage Mania 2009 auction. It will be one of 383 quilts donated to this years Fiber Arts For A Cause to raise money for the American Cancer Society. Pre-auction viewing of all the quilts begins April 29th.
It is donated in memory of a friend who loved these mountains.

Tomorrow this quilt along with the large one I made of this same view, "Our Biosphere Reserve", will be displayed at the Cliff Dweller's Gallery in Gatlinburg, Tennessee. I will be there throughout the afternoon demonstrating the collage technique I developed using scraps of fabric.

Saturday, April 18, 2009

That Last Seam in the Binding

I have tried a number of different techniques to sew that last seam in the binding. You all know the one .. the seam that cannot be sewn until after you've stitched most of the binding onto the outside edge of the quilt to get to the point when you can determine how much is excess. Getting this last seam in easily and neatly was a struggle for me until...
I found a tutorial for "Joining the Binding" by following a link to Sew Happy Quilting from someone coming from there to my blog. I cannot tell you how happy I am to have discovered an easy and sure-fire way to figure out the needed length and best way to seam it together. I've bookmarked that post, but have had difficulty following the steps to manipulate the fabric because the binding is white fabric that makes it difficult to determine the laps and folds in those photos. My initial purpose for snapping these was for my personal reference. But I'm so thrilled with this technique I've just got to "spread the word".

My bindings are cut longer that I know they need to be. I start stitching the binding to the quilt about 10-12 inches in from its end. I stop stitching the binding to the quilt about 12-18" from the start. Somewhere near the center of that gap where the binding is not attached to the quilt, fold the binding strip on the right side straight up towards the middle of the quilt.
Lay the left end of the binding strip across the right one and fold it toward the center of the quilt parallel to the right one.
Trim away the excess length of both ends.
After cutting it will look like this.
To make a diagonal seam that matches all the others in the binding, open both ends of the binding, pin those cut ends perpendicular to each other, draw a diagonal line across the corner.
Stitch the seam on the drawn line. Then trim away the excess fabric.
Finger press or iron the the seam, refold the binding, then pin and stitch that perfect length with a perfect seam to the edge of the quilt.
Yeah! It's done! It was easy! It's neat! There's noway anyone could ever tell where you began or ended sewing the binding to your quilt.

These instructions with the photos can be downloaded from Scribd as a PDF file to your computer for you to print. (Just click on the red type to do so.) My printed copy is pinned on a cork board next to my sewing machine.

PS: Here's an excerpt from an email I received from the author of the "Sew Happy Quilting" blog:


Nellie, I'm so glad you found it useful. I've never seen the method used either. It was just something I figured out on my own when I first started quilting and knew there had to be a way to join and make them look good. I didn't have the Internet then to help out or I guess I'd just do it like everyone else but after trying desperately I finally figured a way. I still to this day do all my binding this way and it works out great.
What a clever woman to figure out this marvelous method. No wonder I could find no reference to this way of connecting the ends of the binding on the web. I'm so pleased to have stumbled across that particular post on her blog. It pays to "surf".

Friday, April 17, 2009

Machine Quilting

The Smoky Mountain Guild Quilt Show is fast approaching. One of my three entries has a quite a bit of work before it's finished.
I had pieced it almost a year ago intending to get the machine quilting done last summer at the cottage. Now I'm in crunch mode to get it done. A few weeks ago it got layered with the batting and backing fabric. I also machine quilted the straight lines at that time.
To experiment with quilting patterns, I placed Press'nSeal plastic wrap over one of the large blocks and drew these patterns with a fat tipped Sharpie pen.
I'm now quilting the spiderweb patterns in all the squares that have spiders. Rather than my original intent of quilting each large block, I'm quilting all the small squares scattered through the twelve blocks that will have the same pattern. Each one gets easier as I develop a rhythm for stitching that pattern. Also, this sequence gives me the option to change thread color for the other patterns.

I'd like to share my trick for getting a grip on the fabric while machine quilting. I use 3M sand paper foam rubber pads that I found at a JoAnn Fabric/Craft store in the woodworking department. It takes only a slight downward pressure for them to do their job of keeping the fabric taut and sliding it around on the machine bed. It's easy to reposition them AND my fingers are free for all the other things that have to be done while sewing.
Well, back to the machine.

Wednesday, April 15, 2009

Playing With Alicia

My friend, Alicia, just left after a ten-day visit. I've posted about her visits and our projects in previous years. Having a major project to work on is a tradition for us. It usually involves making presents for our mutual friends. Last year it was the birds. This year it involves this bag of voluptuousness.
Our shopping was done on Alicia's first day. Here she is cutting and stitching.
The weather was unseasonably cool for most of her visit. There were only two days we were able to sit outside to stitch. Between our time out there and in my studio we took a few day trips that included my husband. One was up to the Smoky Mountains.
We had a picnic next to a mountain stream ... just below the Chimney Tops.
At this altitude the trees were still bare, but the wild flowers were blooming.
Near the top was quite a bit of snow ...
... and ice cycles on the shady side of rock cliffs.
As for our project, we each completed seven of these.
The feathered one is created by Alicia. I made this glamorous one.
I cannot reveal the others until they are gifted next Christmas because many of the recipients read this blog. We are calling these "pin-up potpourri pouches" since we think few of our friends would carry these suggestive beauties as evening bags. Besides, even though some of them are "D" cups, they're hardly large enough for all the stuff that we older women find necessary to carry on an evening out.

Saturday, April 04, 2009

Spirit Dolls

I mentioned at Bee that it would be fun to do a round-robin exchange with spirit dolls. Everyone was agreeable IF we had a pattern. Since it was my idea, making a pattern for the doll is up to me.
On the left is the outcome of my first draft. On the right side is the result of my finalized pattern for a 12" tall doll.
There is no doubt about her gender in spite of her lack of breasts. I figure at some point during the rounds she will acquire a set along with a lot of other interesting and decorative goodies.

I've come up with a different method for working with this pattern from the way I instructed making the bird. Both patterns are transferred to a wax backed freezer paper. The cut edges of the doll pattern pieces are the seamline.
I use a light box to position the freezer paper pattern over the area I like on the wrong side of the fabric. After the pattern is ironed to the fabric rough cut at least a 1/2" allowance around the pattern. I again use the light box to position the pattern with the ironed on fabric to a "good" spot on the right side of the fabric. Then again rough cut the fabric at least a 1/2" from the paper edge. It's very easy to sew the seam at the edge of the pattern with an open toe foot. I shorten the stitch length to "2" on my Pfaff machine. The seam is stitched all around the pattern piece (do not leave an opening for turning). Trim close to the pattern with pinking shears.
If you don't have pinking shears, it is necessary to clip into the seam at the curves so they will be smooth when turned inside out. The sharp inwardly curved seam between her feet needs to be clipped that way.
To turn the body inside out I drew a 2" long line in the middle of her back to cut an opening.
Using tweezers is helpful to grasp narrow ends to pull them through the body and out the cut opening. After the body is turned right side out draw a 5" long line from the toes upward to give her two legs. Stitch a seam along the line being sure to secure the thread ends.
The arms are cut and sewn the same way ... a closed seam around the pattern. The slit for turning is made at the top in the area that will be sewn next to the body.
The pattern for the head is laid out on the fabric and sewn in the same manner. Leave an opening in the seam at the chin for the neck on the body shape to fit into. Cut excess fabric in the shape of a neck at the opening. The dotted line represents the placement of the stuffed neck when the head is attached to the body.
Turn all the body pieces right side out. Use a fiber-fill to stuff the arms, head, and body. The opening of the back is closed with the ladder stitch. Take a running stitch on alternate sides of the opening. A number of stitches may be made before drawing the seam shut.
Sew the arms in position with a ladder stitch seam from the center of the front up over the shoulder to the center of the back. This allows mobile arm movement.

Tuck the excess "neck" fabric inside the opening of the head. Position the head over the stuffed neck on the body. It's a bit fiddly. Use the needle to help stuff and smooth the loose fabric.
Use the ladder stitch to attach the head to the body. I stitched the backside first, then added more stuffing to puff out the face before stitching the front closed.
And that's how to make a spirit doll. She's ready to be decorated and embellished however her maker wishes to portray her persona. I'm looking forward to my friends each adding their unique touch to my doll ... bits of their creative spirit.
The pattern and these instructions can be downloaded to your computer and printed out... just like for the bird.

  • Go here for the pattern
  • Go here for the instructions